
Photography Basics
Exposure Metering Explained Simply
Your camera thinks snow is too bright and turns it gray – until you understand how exposure metering actually works. Here’s how it thinks.
01What Your Camera Actually Measures
Your camera’s exposure metering works by measuring reflected light – the light that bounces off your subject back toward the camera. It analyzes the brightness distribution across the frame and tries to calculate the right exposure from that automatically.
For this to work reliably, the camera assumes an average value: it assumes that most scenes reflect about 18% gray on average. That corresponds to a neutral brightness value – not too bright, not too dark. This principle works surprisingly well in many situations and keeps your images fairly well balanced by default.
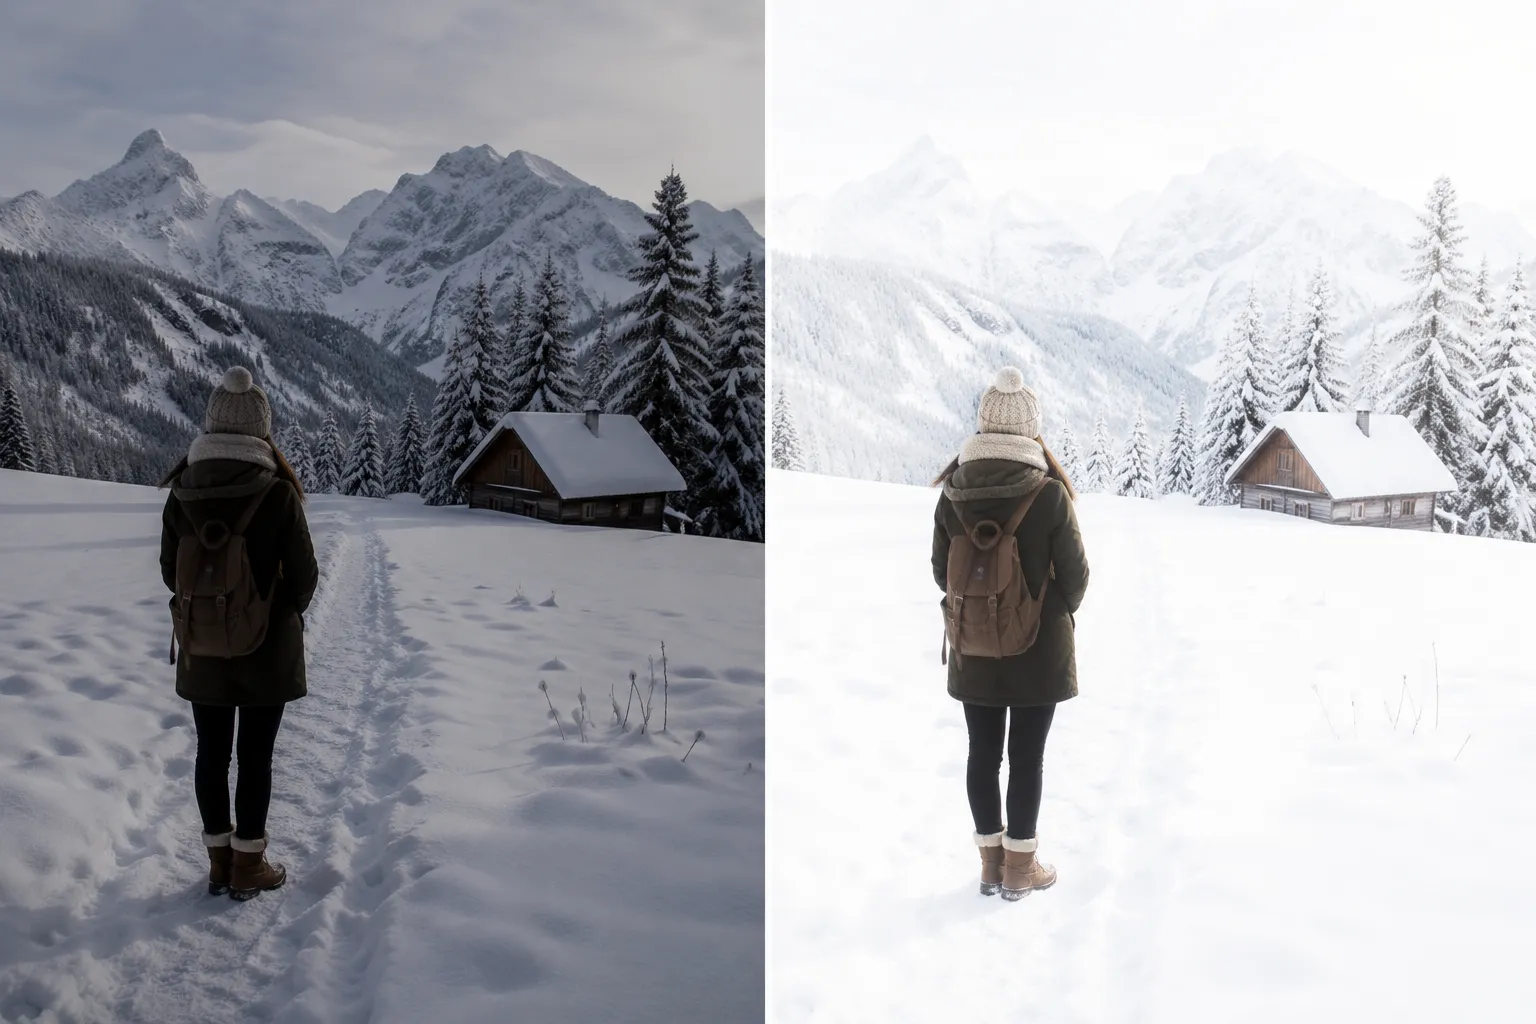
Problems only arise when your subject is noticeably brighter or darker than that average. If you photograph a snowy landscape in bright sunshine, for example, the camera measures so much brightness that it thinks the image is too bright – and automatically reduces exposure. The snow ends up looking gray instead of white. Conversely, with a dark subject, like a portrait against a black background, the camera tries to brighten the image, which can make it appear slightly overexposed.
To avoid this, you can step in with exposure compensation when needed. It lets you manually push the metered exposure brighter or darker without leaving automatic mode. I cover this in detail in my article on exposure compensation.
02The Different Metering Modes at a Glance
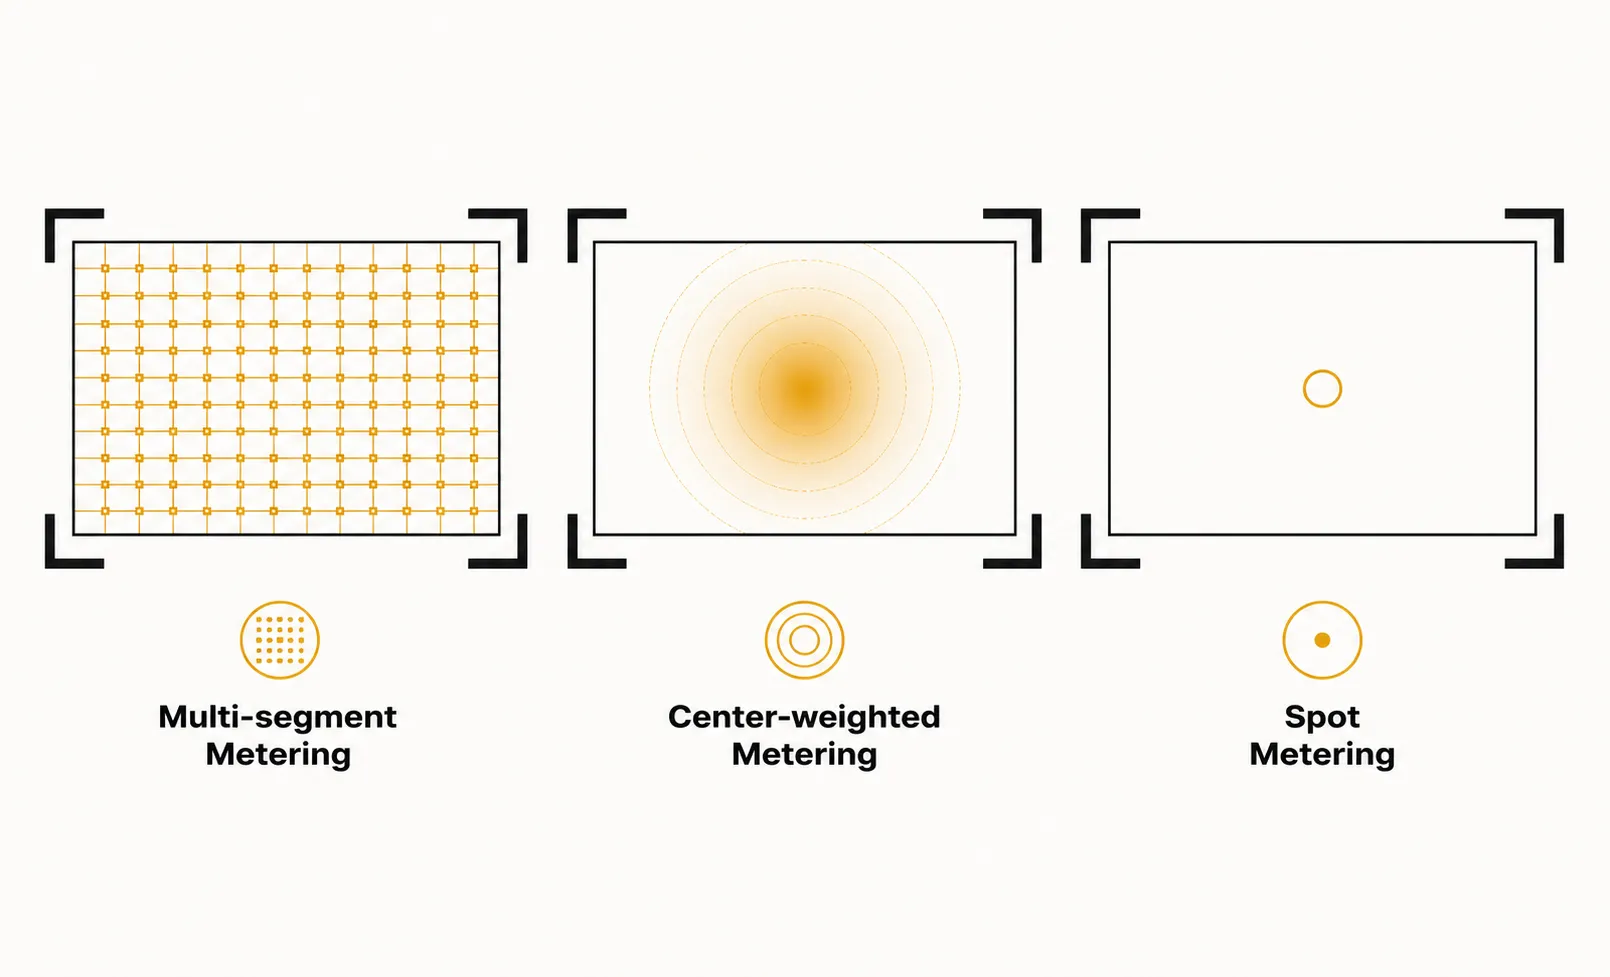
Almost every modern camera offers several metering modes to determine exposure. The most important ones are multi-segment metering (matrix metering), center-weighted metering, and spot metering. Let’s take a closer look at each:
Multi-Segment Metering (Matrix Metering)
This mode measures exposure across the entire frame. The camera divides the whole image into many small zones, analyzes each one, and combines the values into an average. Modern cameras – from brands like Canon or Nikon – use complex algorithms that also factor in the recognized subject and its position in the frame. Multi-segment metering is the most versatile and reliable setting, since it delivers well-balanced results in most situations. Especially if you’re just starting out in photography, this is the mode I’d recommend using by default. It gives you a feel for light and exposure without having to deal with manual corrections right away.
Center-Weighted Metering
With center-weighted metering, exposure is measured mainly in the middle of the frame. The outer area only partially factors into the calculation. This mode is useful when your subject sits centrally – in portrait photography, for example – and you want the camera to base exposure on that main subject.
It’s described as “weighted” – meaning the central area of the image counts more than the edges. That can be practical if you’re shooting a portrait and the background is noticeably brighter than the face. The camera measures mainly in the center and prevents your subject from turning out too dark.
However, this method can produce inaccurate results for off-center subjects, especially when the main subject sits to one side or the light is unevenly distributed.
Spot Metering
Unlike multi-segment and center-weighted metering, where the camera automatically analyzes larger areas of the frame, spot metering targets a single point. The camera measures brightness precisely at that chosen spot – usually the center, or wherever your active focus point is. That lets you decide exactly which area of the image should be correctly exposed.
This mode is especially useful for subjects with strong brightness differences – a face in shadow, a brightly lit flower, or a scene with a spotlight on stage.
Partial Metering and Averaging Metering
On some cameras, you might come across the terms partial metering or averaging metering. Partial metering resembles spot metering but measures a somewhat larger area around the subject, factoring in a bit of the surroundings too. It’s useful when you want to expose for a specific part of the frame without needing the pinpoint precision of spot metering.
Averaging metering is essentially the predecessor of center-weighted metering and is mostly found on older camera models. Unlike center-weighted metering, it factors in the entire frame equally – no area gets extra weight. That can make it less accurate with large brightness differences, but it delivers solid results in evenly lit scenes.
03When to Switch Metering Modes
In many situations, your camera’s automatic metering works surprisingly well – especially for evenly lit subjects, like landscapes or scenes with balanced light. But there are moments when the camera can no longer properly judge what actually matters in the frame.
If you’re photographing a subject with strong light-dark contrast, or if you want a specific area of the image to stand out – a face in shadow, a bright detail in the foreground, or an object under a spotlight – it’s worth switching metering modes. Checking the histogram also helps you see whether detail is getting lost in the highlights or shadows.
Spot metering can be useful here, since it lets you measure precisely at the critical point instead of factoring in the whole frame evenly. Center-weighted metering also helps when your main subject sits centrally in the frame and you want to make sure that area is correctly exposed, regardless of how bright or dark the background is.
04External Light Meters and Gray Cards
Besides your camera’s built-in metering, there are also handheld light meters. These measure incident light directly – not reflected light. That gives you especially precise readings, useful for studio work or portrait photography.
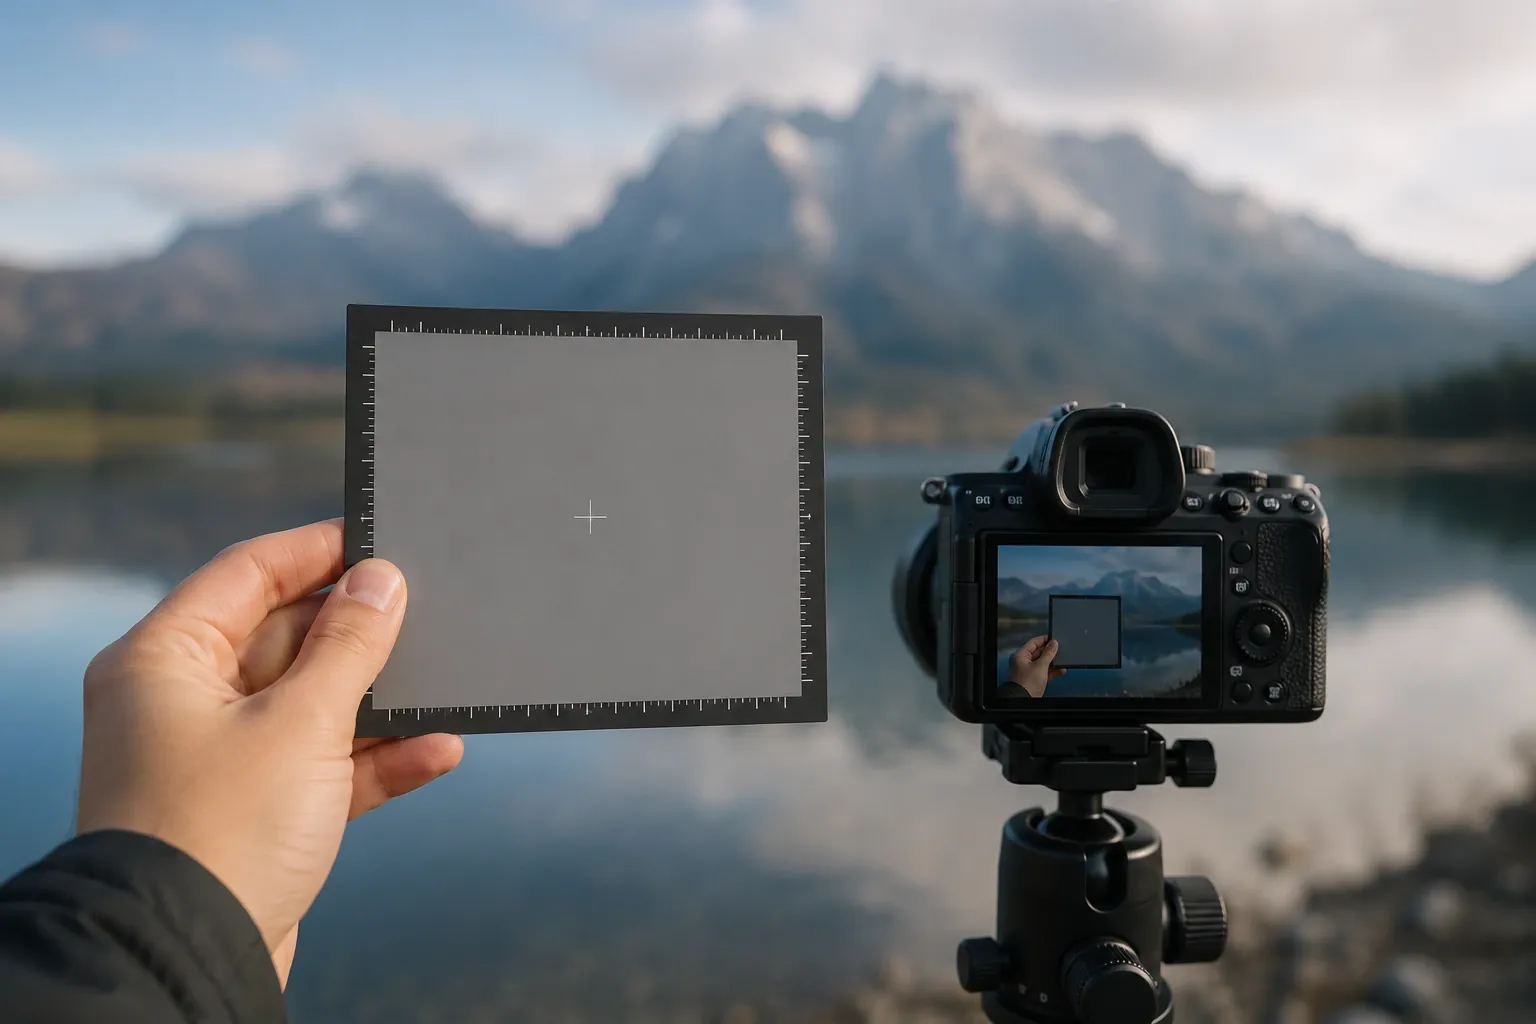
A practical alternative is the gray card. You place it briefly in the frame, meter exposure off the card, and then set your camera manually. That gets you a correct exposure regardless of your subject’s color.
05Conclusion: Understanding Metering Means Shooting More Deliberately
Exposure metering isn’t magic – it helps you interpret light correctly. Once you know how your camera measures, when you need to correct it, and which metering mode fits your subject, you’ll never leave your exposure to chance again.
The better you learn to understand your camera’s behavior, the more deliberately you can control exposure – for photos that come out exactly as bright or dark as you pictured them.
06Metering in Practice — Try It Yourself
The best way to learn the different metering modes is to simply try them yourself. Grab your camera, pick a few different subjects – maybe a portrait in the shade, a bright facade in the sun, or a high-contrast landscape – and watch how the exposure changes as you switch between multi-segment, center-weighted, and spot metering.
Pay attention to how the brightness of your main subject changes and which result you like best. One thing to remember: after experimenting, don’t forget to switch your camera back to multi-segment metering – it’s the safest and most versatile choice for most shots.
Common Questions About Exposure Metering
Which metering mode should beginners use?
Multi-segment metering (matrix metering) is the best starting point. It’s the most versatile and reliable setting and delivers balanced results in most situations.
Why does snow often turn out gray in photos?
The camera assumes that scenes average out to about 18% gray. With very bright snow, it measures too much brightness and automatically reduces exposure, which makes the snow look gray instead of white. Exposure compensation can correct for this.
When should I use spot metering?
Spot metering works well for scenes with strong brightness differences, like a face in shadow, a brightly lit flower, or a subject under a spotlight. It measures a single point instead of the whole frame.
What’s the difference between multi-segment and center-weighted metering?
Multi-segment metering analyzes the whole frame in many small zones and averages the result. Center-weighted metering instead gives more weight to the center of the frame, which works well for centrally placed subjects like portraits.